Chainer character embeddings
(Continues from Numpy character embeddings.)
The numpy embedding model turned out to be extremely slow because
it wasn’t vectorised. Chainer is a python deep learning
package that enables us to
implement the model easily with automatic differentiation and the
resulting vectorised operations are fast—and can be run on a GPU if you want.
In this post I’ll explore how the different optimisers perform out of the box.
Chainer
There are a few deep learning packages available with Python interfaces at the moment (and more are being added). From the venerable Theano and its offspring like Lasagne and Keras, to Tensorflow (which is also supported by Keras).
Chainer caught my attention when I first looked at because it made
recurrent neural networks easy to do. Theano, which was the state-of-the-art
package at that stage, struggles with RNNs—and RNNs are awesome.
Chainer’s interface is a joy to work with and I think the define-by-run
scheme is very clever.
It might not be the fastest library out there but it is extremely
flexible and the fact that you can install it with pip install chainer
clinched it for me. Many other packages are difficult to install and don’t
really want you to use it without the GPU—sometimes you just need a
medium-sized deep model that is easy to deploy.
Embedding model
Back to our simple embedding model.
The main trick in this implementation is to pack the input
sequences into a 2 dimensional ndarray.
Each row is a training point and each column represents a token.
The number of columns is the size of the window you’re using to
predict the next token.
Chainer then applies this input matrix to the embedding matrix .
The EmbedID operation broadcasts the
embedding lookups over the last dimension of the input array, resulting
in a three dimensional ndarray. If we now reshape this
ndarray our embeddings are neatly packed next to each other
just like we wanted.
The last step is a simple linear layer.
class EmbeddingModel(Chain):
    def __init__(self, vocab_size, embedding_size, ngram_size):
        super(EmbeddingModel, self).__init__(
            l1 = L.EmbedID(vocab_size, embedding_size),
            l2 = L.Linear(embedding_size * ngram_size, vocab_size)
        )
        self.vocab_size = vocab_size
        self.embedding_size = embedding_size
        self.ngram_size = ngram_size

    def __call__(self, x):
        h = F.reshape(self.l1(x), (-1, self.embedding_size * self.ngram_size, 1))
        y = self.l2(h)
        return y
Training setup
Training is accomplished by defining a loss function—in our case
the softmax cross entropy loss—and calling the backward() method on the
loss to run automatic differentiation via back propagation on the model.
The optimizer object
uses the parameter gradients to update the parameters.
The following standard training loop was taken from the chainer
documentation:
# Setup the model with a vocabulary of V,
# hidden dimensionality of H and window
# size of M.
model = L.Classifier(EmbeddingModel(V, H, M))
optimizer = optimizers.NesterovAG()
optimizer.setup(model)

# Training loop
for epoch in range(n_epochs):
    indexes = np.random.permutation(datasize)
    for i in range(0, datasize, batchsize):
        x = Variable(train_x[indexes[i : i + batchsize]])
        t = Variable(train_y[indexes[i : i + batchsize]])
        model.zerograds()
        loss = model(x, t)
        loss.backward()
        optimizer.update()
Optimisers
Chainer comes with a few of the beloved deep learning optimisers, like
adam and NesterovAG as part
of the package.
Different batch sizes
Because deep models are usually trained with minibatch stochastic
gradient methods, we are stuck with a bunch of optimiser hyperparameters.
Ain’t nobody got time to tune all of them for all the available optimisers, so
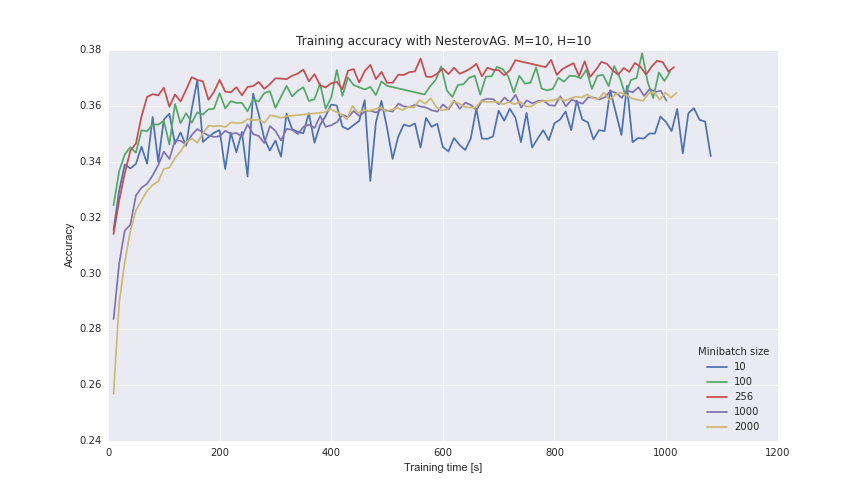
let’s pick NesterovAG to see what a good minibatch size is.
We use a small collection of Shakespeare text as the training data; set the character window size to 10; and the embedding dimension also to 10.
(We plot only the training accuracy because we’re interested in the optimiser performance and not yet in how well the model generalises.)

Different optimisers
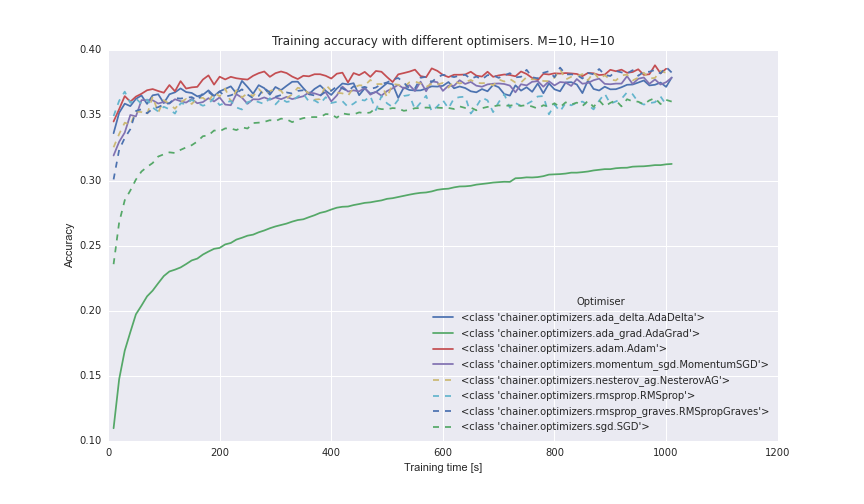
Now we can compare the different optimizers’ out-of-the-box performance with a minibatch size of 256.

Looks like the three front runners are Adam, RMSPropGraves, and NesterovAG.
Embedding dimensions
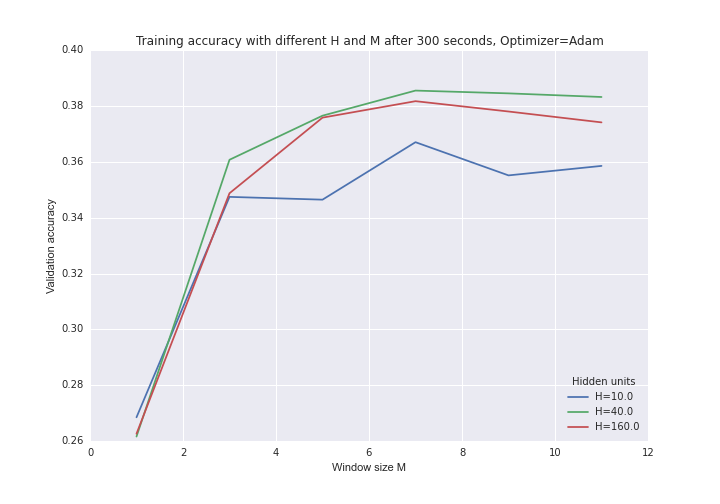
Now we can experiment with a few different hidden layer sizes and window sizes.

As the window size increases the next character is more accurately predicted. A hidden layer size of 40, however, gives better accuracy after 300 seconds than a larger network because the larger network is also slower to train.
Generate
Finally, as always, let’s generate some text!
SEROLED:
Not, but I way?
LARTERMEE:'

OXFRONUK:
Hers att, tor my the text Soald hemereef Pracceit the th lood,
wimen's oflly hop selingeasp wimy biontog nofour prayse?
Goout, bown loth.

FRIALAS:
Now, KI pet char.
